
This post brought to you by Cricut.
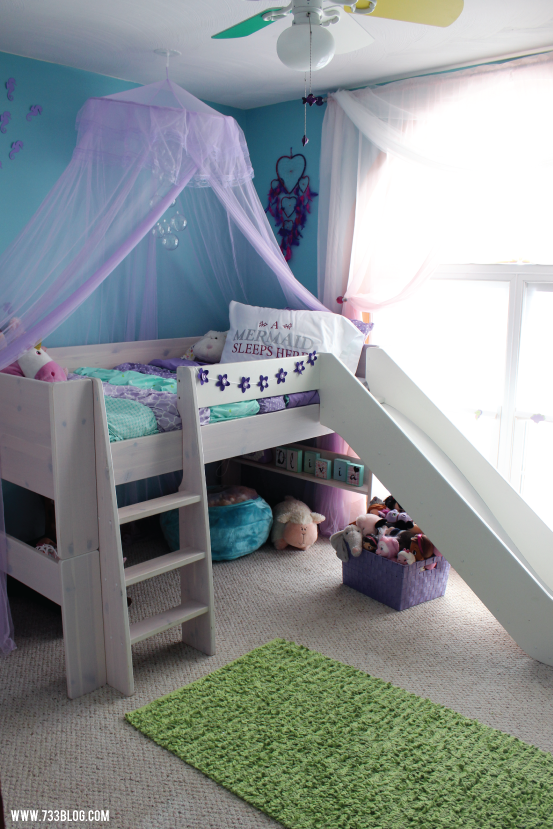
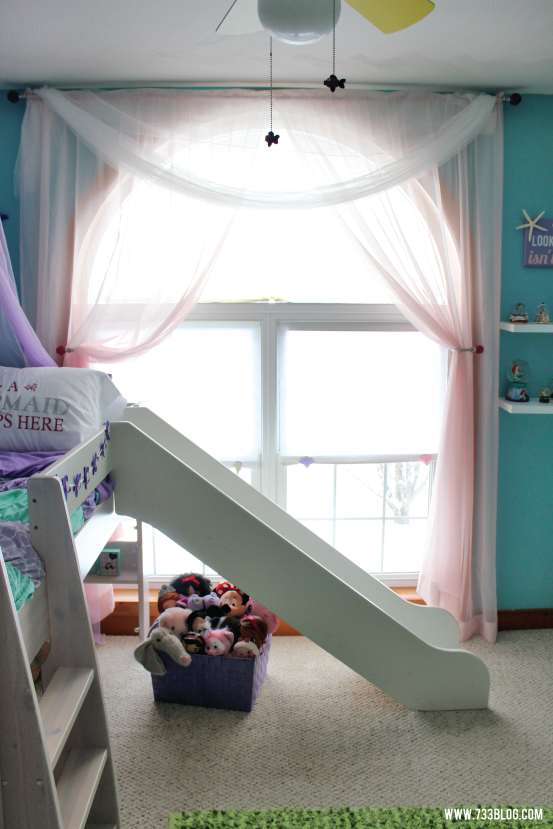
Yesterday I shared the BEFORE photos of my daughters room. Today I get to finally share with you the after – which is my project submission for the finals of the Cricut Design Space Star Challenge!
I ended up going with a Mermaid theme instead of The Little Mermaid… which I think surprised Olivia at first. She had asked for her room to be a surprise, but she still had little clues as to what it would be and had guessed Little Mermaid. I think she was expecting to walk in and see all things Ariel and Melody. But I’d rather have an item, like a picture, that can be easily switched out then splattering a character all over the room. That being said, this is an truly an Under the Sea themed room with a nice sprinkling of mermaids, all that can grow with Olivia!
The bed had to stay in the same place because of the layout of the room, but I still think the changes have a huge impact! I’ll share more details from some of the projects throughout the next week, but if you have any questions, feel free to ask in the comments! Alright, let’s look at all the pretty pictures!
 Cricut Explore Project # 1: DIY Grotto Sign made with balsa wood, printable vinyl and cardstock — UPDATE: Balsa Wood Sign Tutorial is now live
Cricut Explore Project #2: DIY Felt Flower Bunting — Update: Flower Bunting Tutorial is now live!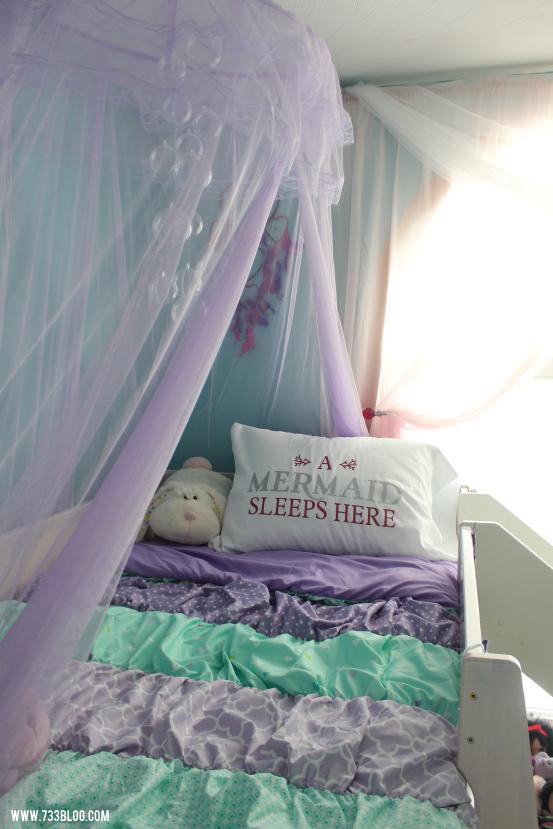
Cricut Explore Project #3: Mermaid Pillow made with iron-on glitter vinyl
 The DIY Bubble Chandelier is a fav that was made with clear plastic Christmas ornaments and fishing line. UPDATE: DIY Bubble Chandelier tutorial is now live.
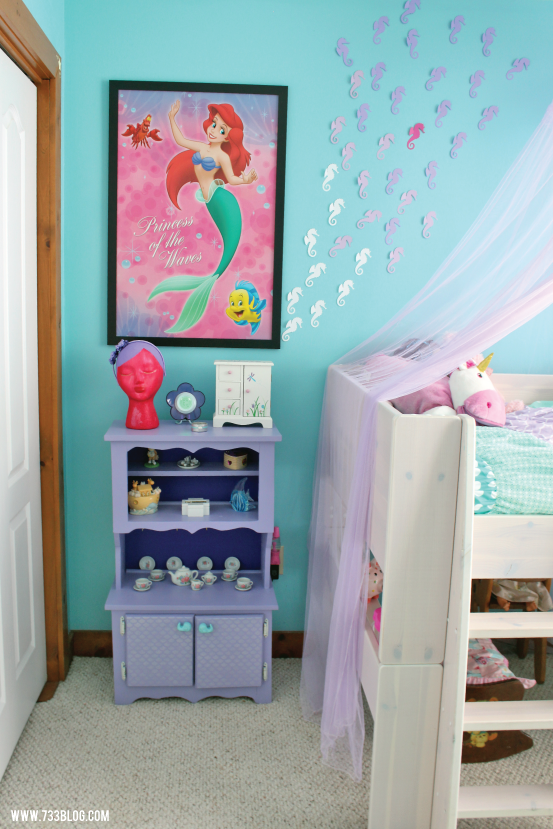
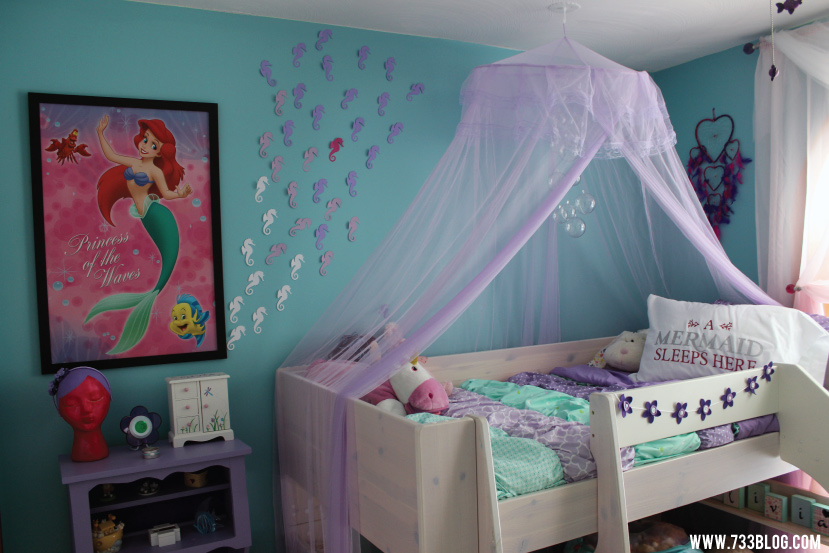
Cricut Explore Project #4: Sea Horse Wall – I used painters tape to stick them to the wall. 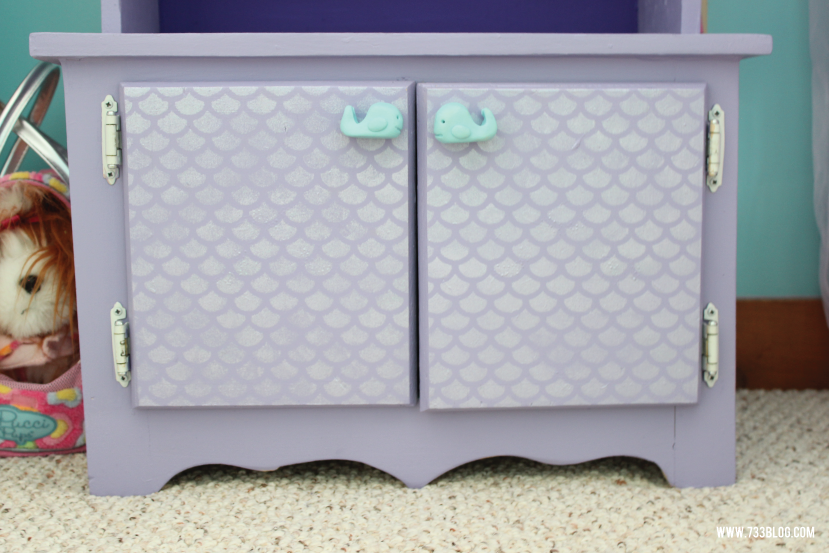 Cricut Project #5: DIY Scallop Stencil
I am so happy with the DIY Clay Whale Knobs too – the duo always makes me smile. Update: The Clay Knob Tutorial is now live.
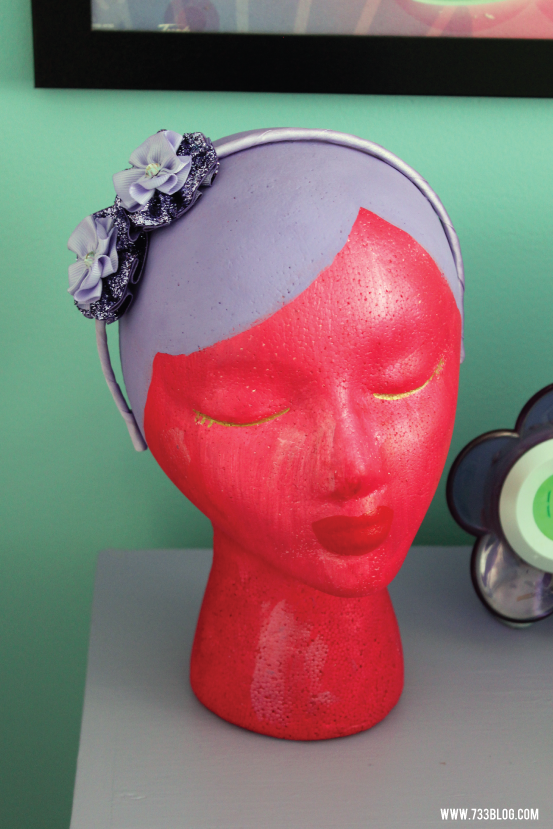 This foam head headband holder was Olivia’s creation. I have a box of foam heads left over from my FloraCraft challenge. She was looking for a craft project to do and asked me if she could paint one. I said yes and this is the result! She chose the colors and even though I recommended just painting it one color and not doing hair, she was bound and determined to do it her way and she was so right! She did this with very little help from me and I love the result. So proud of my crafty girl!
Cricut Explore Project # 6 – Easy Labeled Drawers
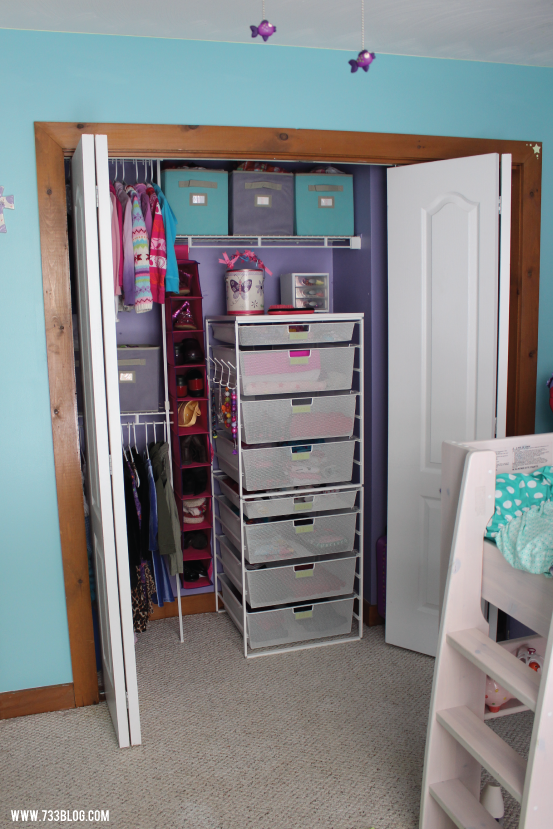
The closet is one of the projects I am most excited for! The BEFORE of the closet was such an embarrassment. It was not utilizing the space well and I was constantly shoving stuff inside. Now I have a spot for everything – the top three bins hold clothes that have been handed down to Olivia, but are still too big. The other two bins hold clothes that are too small and we willl be handing down. The Elfa drawers from The Container Store are AMAZING (I love them so much I ended up buying a set for my sons closet too!)! I used them to replace her dresser, which gives her more space in the room. They hold all of her clothes perfectly and are easy to access. The labels help her (and my hubby) when putting clothes away. Have a non-reader? Consider adding pictures of the contents instead of words!
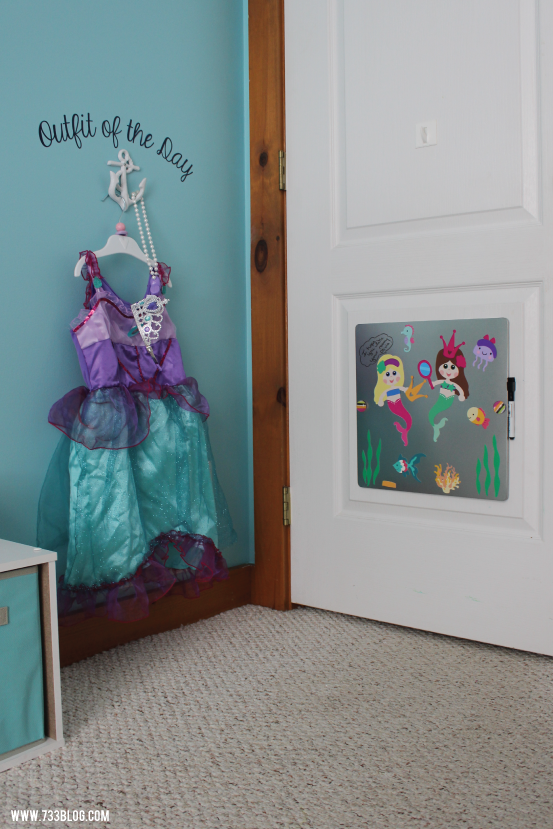 Cricut Explore Project #7 & #8: Outfit of the Day vinyl and Magnetic Mermaid Board — Update: Magnetic Busy Board Tutorial is now live.
I placed the magnetic board on velcro 3M Command strips so she can take if off the door and use it on trips, etc. This is by far her favorite part of the room! She has used this for hours already – she loves playing with the Mermaid dolls that I designed and is constantly making them sing by writing words in bubbles next to them!
She has also really come to love the Outfit of the Day station. She likes me to help pick her outfit but she wants to hang it on the hook all by herself. I use to lay her clothes out on the floor the night before, this is just a much cuter version of that!
The DIY Faux Capiz Shell Chandeliers were left over from Olivia’s 4th Birthday Party that I had hung in her room and looked too perfect in the space to take out!
Storage was lacking in Olivia’s room before so I made sure that she had PLENTY this time around. Each of the bins is labeled, Barbies, Drawing Supplies, Electronics, Baby Doll Stuff, Small Toys – that way everything has a place and it is easy to clean up and store items.
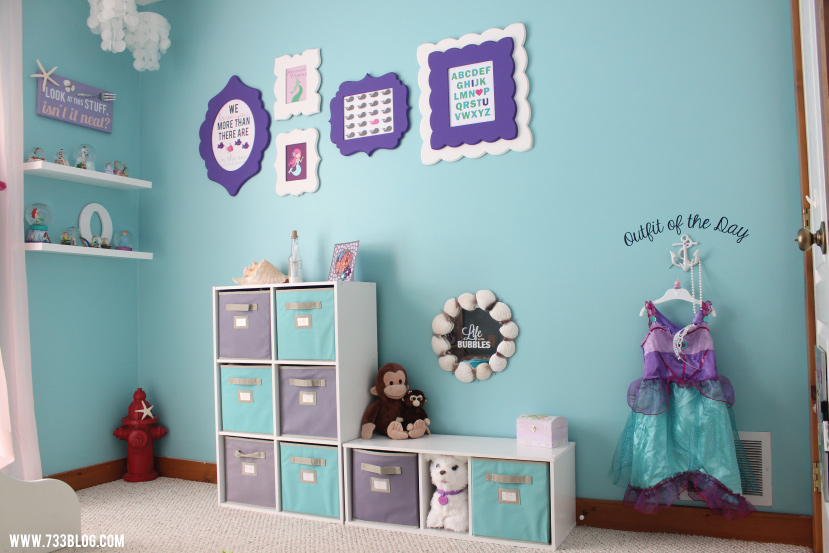
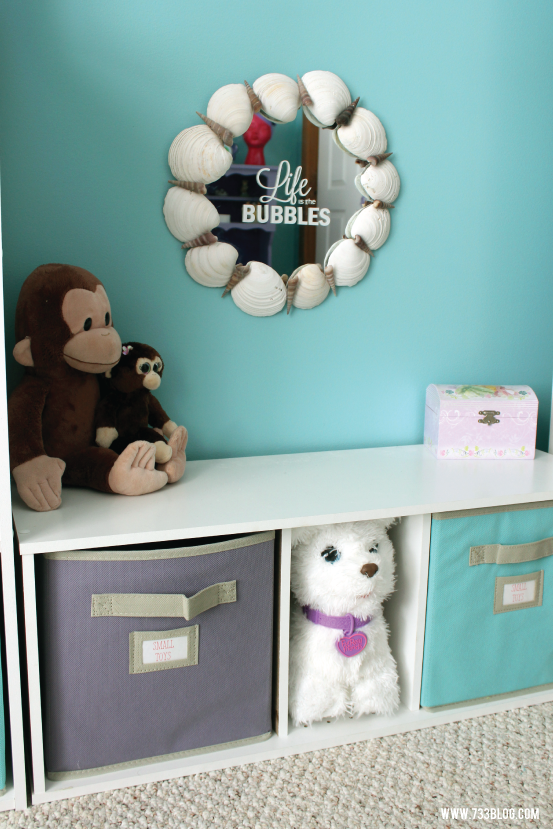 Cricut Explore Project # 9 & #10: Labeled Bins and DIY “Life is the Bubbles” Sea Shell Mirror with Window Cling
Update: The Sea Shell Mirror Tutorial is now live!
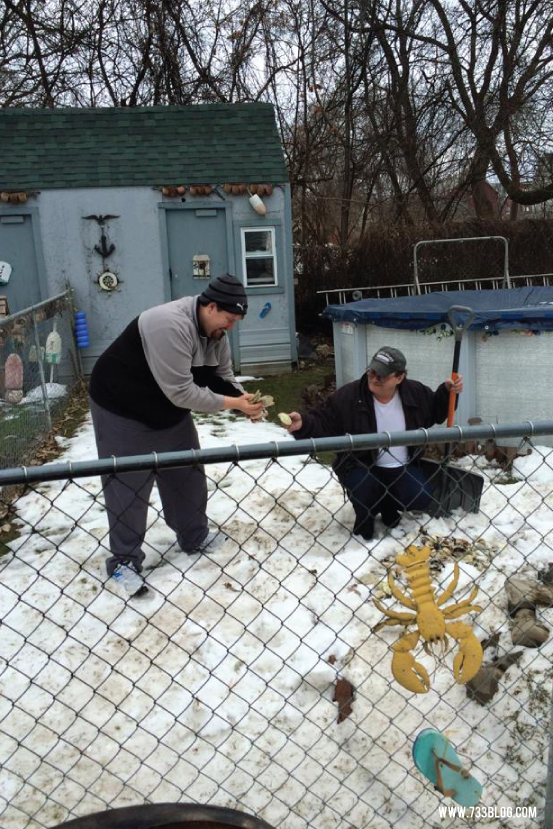 I must give a shout-out to my friend Jeremy and his in-laws, Jeff and Winona – they literally dug through the snow in the backyard of Jeff and Winona’s house to gather the sea shells for the mirror for me! They have a whole collection in their garden from all of their trips to North Carolina!
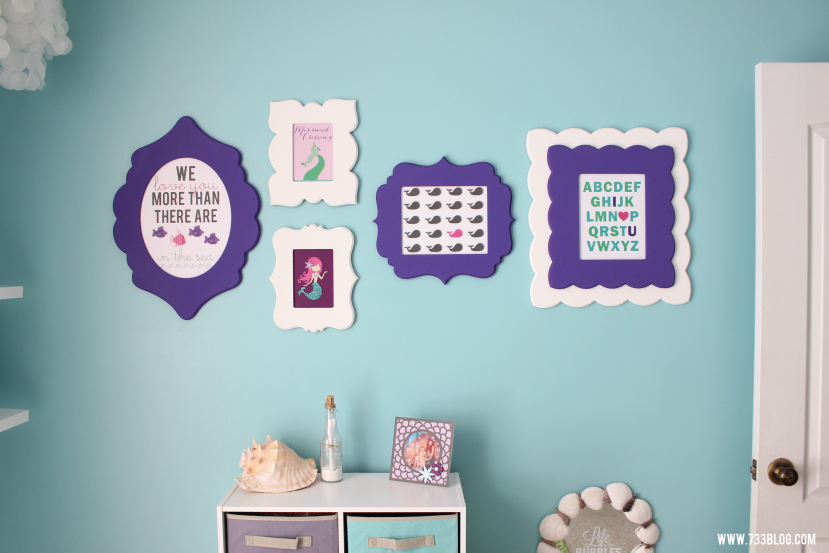
Cricut Explore Project #11 & #12: DIY Paper Mermaid and Whale Specimen Art for the custom Gallery Wall
I’ll be sharing more on this super awesome gallery wall and sharing the free printables next week — UPDATE: Get the free printables now!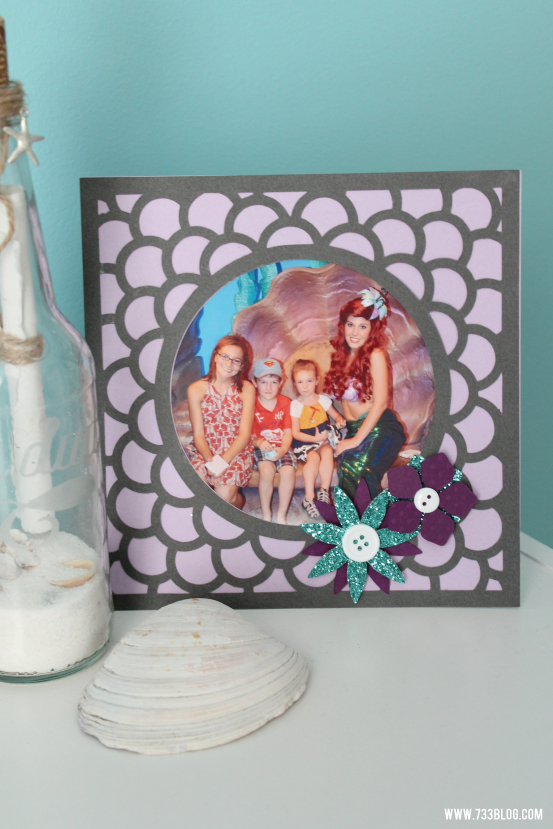 Cricut Explore Project # 13: DIY Scallop Picture Frame
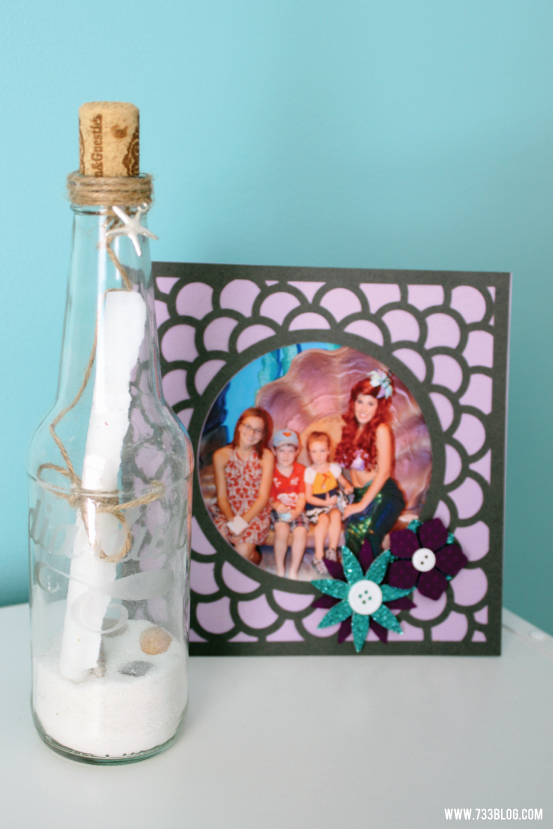 Cricut Explore Project #14: Glass Etched Message in a Bottle – the etching says “Dia Duit” which is Hello in Gaelic.
And yes, there actually is a message inside:
Cricut Explore Project #15: DIY Vinyl Canvas Sign
 The fire hydrant also made it back into the room with a little DIY clay starfish calling it home.
 This window is all one unit, which means adding shades is a bit hard. The ones I chose use adhesive strips to attach to the frame. Because of this, they have clips that hold the shade open. They are nothing special, so I spiffied them up with a few nautical friends:
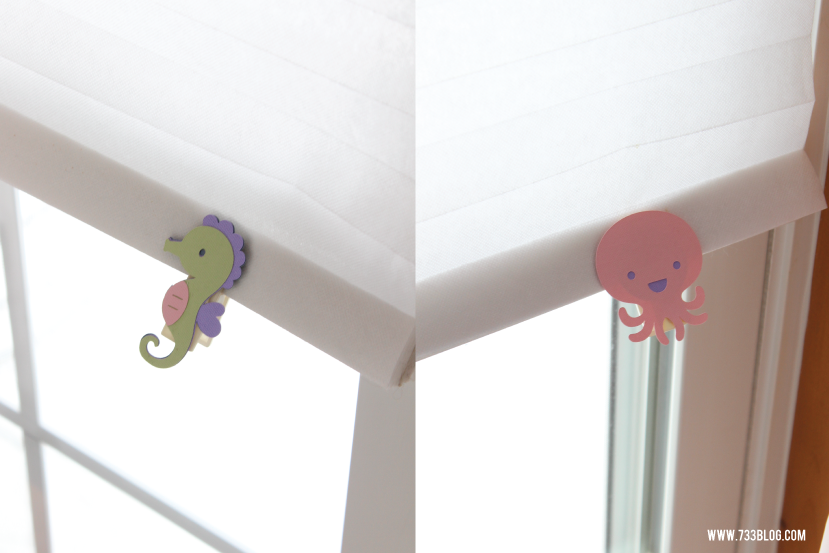 Cricut Explore Project #16: Nautical Friends Clip Covers
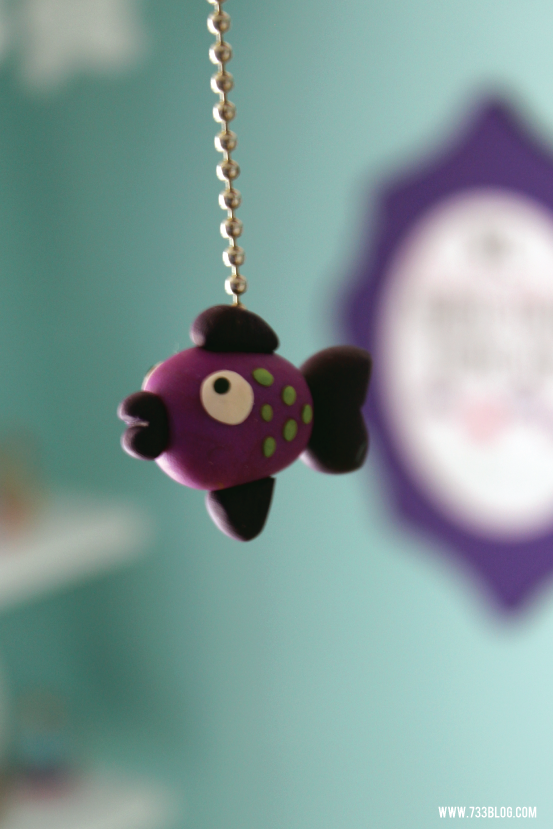 I love my little DIY Clay Fish Fan Pull! It looks like him and his brother are swimming in the middle of the room!
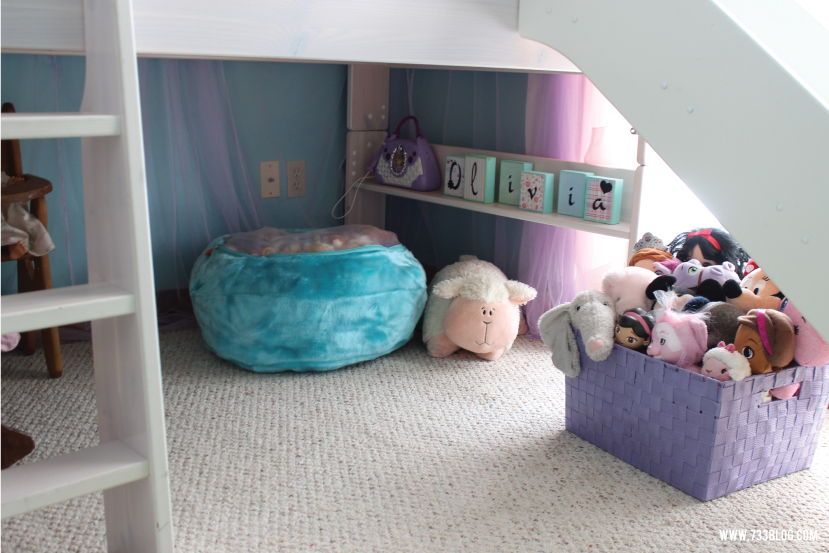 This is what I did with all of her stuffed animals! The soft ones and ones she doesn’t play with as much got placed in that awesome Stuffed Animal Bag from Boon that doubles as a floor pouf! She can still easily get to the animals inside by unzipping the mesh top. My son doesn’t think it is too comfortable to lay on, but we’ve used it several times and it works perfectly. You can just sprawl like a regular bean bag, but Olivia uses it to sit and do her hair or to play with her magnetic board. I think it is way fun! The stuffed toys that had hard plastic or that she plays with regularly were placed inside the purple basket for easy access.
The Olivia name blocks were one of my very first Cricut projects I ever made, 5 years ago! I had a small Cricut machine that cut 6″x12″… the Cricut cutting machines have come a long way since then.
How much did the room cost?
As a reminder I had a Cricut budget of $1,000 for the room makeover. Normally I don’t spend that much on changing things up in my kids room, but since I had the money, I decided to splurge on a few things, especially to make the closet work better for our needs!
Paint & Supplies $100.00
Bedding & Sheets $59.99
Pillows $16.00
DIY Mermaid Pillowcase $10.00
Stuffed Animal Storage Basket – $10.69
Boon Animal Bag – $34.46
Bed Canopy – $13
DIY Bubble Chandelier – $8
DIY Seahorse Wall Art – $1
Anchor Hook $9.231
Arch Shade – $19.97
Ikea Mesh Curtains – $10.00
DIY Shade Clips – $3
Elfa Drawer System – $245.00
Plastic Clothes Hangers – $4
Drawer and Bin Labels – $1
Hanging Shoe Storage – $7.00
DIY Foam Head Headband Holder – FREE, all items on hand
Tea Set – $7.95
Hutch Makeover – $5
Lava Lamp Nightlight – $7
DIY Magnetic Mermaid Board – $7
DIY Seashell Mirror – $8
Michel Mercier™ Detangling Brush – $15
DIY Grotto Sign – $4.50
Martha Stewart Fabric Drawers (x13) – $78.00
ClosetMaid 6 White Laminate Storage Cubes – $40.00
ClosetMaid 12.13-in White Laminate Stacking Storage – $21.00
DIY Collection Sign – $15.00
Floating Shelves – $31.96
O Wood Letter – $3.19
DIY Message in a Bottle – $2
DIY Flower Bunting – $2
DIY Scale Picture Frame – $2
Gallery Wall – Frames were given to me from CutItOut, retail for $75. Artwork designed by me and printed at home, Whale and Mermaid were made with the Cricut – $1 each, Paint and Foam Rollers, $4
3M Command Strips, Velcro – $24.00
DUY Clay Fan Pulls, Starfish, Whale and Octopus Knobs – FREE, clay on hand
TOTAL ROOM MAKEOVER: $812.94
What did Olivia think of her surprise? She was a bit overwhelmed at first. There was a lot of change and a lot to take in! She isn’t one to jump up and down or cry… she absorbs. And then for the rest of the night I heard over and over how much she loves me, she loves her new room, did I see this and how cool is that?!? It was enough to make my heart burst. She was so appreciative and really took in each and every detail of the room.
I put together a video of a bit of the process, the reveal and some clips of Olivia playing in her room for you:
I had so much fun putting this room together. I had some friends that really took the time to help (thanks Jeremy & Krista!) and were awesome sounding boards. We had some really fun text convos throughout the designing process and they made the whole experience that much more fun! I sure hope you like the end result and I would love for you to vote for my Mermaid Room next week!


Absolutely PERFECT!!! It’s like straight out of a magazine. I love it.
I only wish I could decorate an entire room like this (I’m not so great at interior design & never put much effort into it at all). You’ve got one lucky mermaid princess! Awesome job, mom. 😉
Thank you so much Kim! Interior Design isn’t my strongest suit by any stetch, but when it’s for kids I find it TONS easier. 🙂 It was definitely nice having a budget that made playing with different things fun!
Kim this room turned out so adorable!! Love all the mermaid accents!
Thank you Katie! 😉
I love how everything turned out. Great details! Where did you get the bed? I love it because it doesn’t look too high and there’s enough room to play below. Kudos for a wonderful job!!
Thanks for your kind words Heidy! The bed was actually from Overstock several years ago. It is called the Popsicle Loft Bed. They have a bunk bed version, but my daughter was young and liked the loft version much better. 😉
It turned out SO awesome Kim!! I love all of the little details – especially the DIY polymer clay pieces!! The bubble chandalier is brilliant too. Nice work girl!
Thanks Heather! And thank YOU for the clay knob inspiration! I definitely give you a shout out in tomorrows post. 🙂
This turned out SO cute! I’m in love with the bubble chandelier over the bed! Great job!
Thanks Heidi! We love that chandelier, and it was so darn easy to make. 😉
WOW Kim, I love everything about this room!! Great job! So many brilliant details… and that bubbles chandelier?! Amazing! What a lucky girl to have that room and you as a mom. 🙂
Awww! Thank you so much for your kind words.
Hi Kim, I love what you did with your daughter’s room. ADORABLE.
I have a question where did you get the bed?
My lil’ one loved it.
Thank you
Hi Irene! Thank you for the kind words. The bed is the Popsicle Loft Bed. We got it off Overstock.com several years ago.
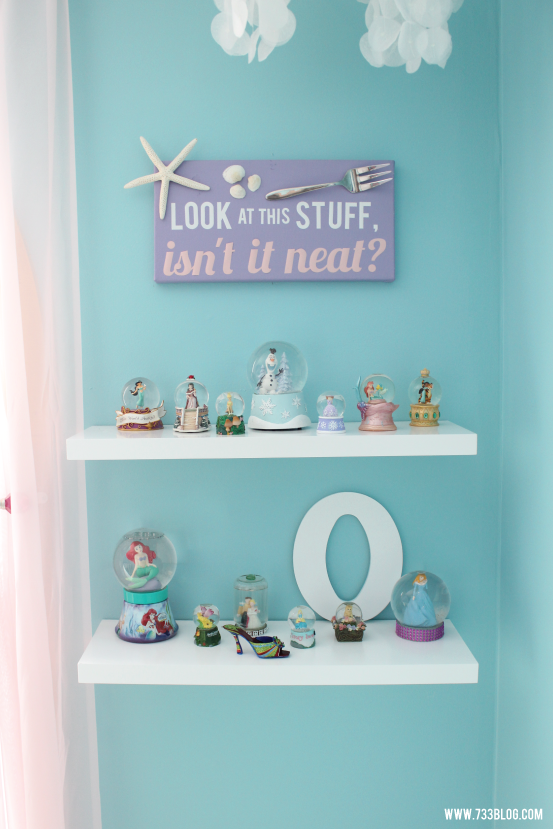
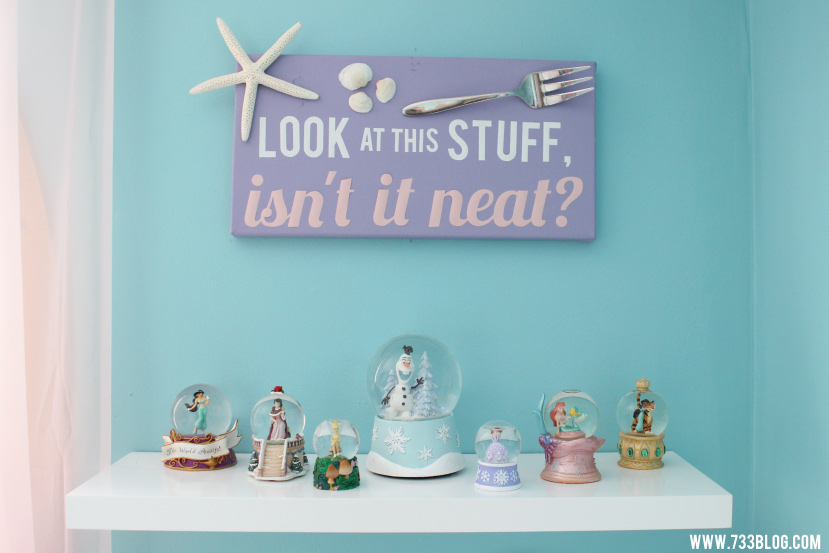
I love the look at this stuff isn’t it neat sign! So cute!
I loved when my daughter saw that sign and said ‘there’s a fork… It’s a DINGELHOPPER!’ LOL
THis room is simply magical! LOVE LOVE LOVE it!
Thank you so much! I really enjoyed putting it together for my girl.
I am in love with this room! I really hope you go through and show how you did something’s. Especially all the clay stuff! I have tons of clay and haven’t used it in ages. Would love a close up photo and then how you made them?!
Great job mama!!
This is truly a magical room with just the right amount of accessories! I’m sure you and your daughter will have many happy memories here. The wall paint is the perfect backdrop, too. May I ask what brand and color you used?
Susan – Sorry for the delay! The Blue is from Home Depot – Behr Ultra Satin – Base is 7754 – 510D4 Embellished Blue. The Purple is from Lowe’s – Valspar Signature in Satin – they based the color off from a picture I had and in their computer it is 1405 Snugglepuss. 🙂
I love all of the mermaid accents! Beautiful room!
This is amazing!! I think the bubble chandelier might be my favorite part, but it’s so hard to choose! Gorgeous!!
So cute! I voted . . . and I love the chandelier!
Thanks so much Amy! I appreciate it!
This is such a beautiful and creative room. I love it!! Ariel was always my favorite. I would love to do this for my daughter’s room one day.
She was always my favorite too, so I’m not real surprised that BOTH my girls are Mermaid fans. 😉 Thanks for your sweet words!
Kim – what a lovely room you created for your little girl. She will always have sweet dreams there! Thanks for sharing.
Thank you so much for your kind words Lynne. I really appreciate you taking a moment to leave a comment. 🙂
Such a cute room for a little girl. Love all the details!
I like how you didn’t go with character themed everything. That way many elements of the room can grow with her and be used up until high school.
Totally in love with her room. Wish i had a girl. Great job. Just wondering where the bed was purchased?. My son would love it so much
The bed came from Overstock.com a few years ago. It is the Popsicle Loft Bed. 🙂
Hi, Kim! My daughter and I love this bedroom so much! My daughter asked for one exactly the same… kkkk
I can’t make one exactly the same, but we agreed to use some of your ideas for her bedroom.
Can you tell me which font you use for the “Outfit of the Day” vinyl? I tested this text with several similar fonts but none of them look as pretty as yours… yours is perfect!
Thank You so much for sharing your ideas with us!
I’m so glad you and your daughter were so inspired! The font is KG Eyes Wide Open. I would love to see your room once the transformation is complete!
Thank You, Kim!
When it’s done I’ll show you for sure!
I really love the DIY sign with the little mermaid quote. how did you do that? I am building a beach bathroom and would love this idea
I cut vinyl with my Cricut Explore and adhered it to a canvas that I painted with acrylic paint. I used Gorilla Glue to adhere the fork and sea shells. 🙂
What size is the canvas? Just a rough estimate would be good to know. Thanks!
For the “Collections” canvas? I believe it was something like 18″ w x 12″ t
I love this room! I am working on a mermaid room for my twin girls and love your ideas here. Where did you get the iron on letters and what size did you use? I love the pillowcase and was hoping to try it myself!
Thank you!
I used my Cricut Explore to cut the letters out of iron-on vinyl.
I love this room! I am currently doing my daughter’s room over into a mermaid theme. And my son’s a firefighter theme. Where did you get that fire hydrant? This room is awesome! Nice job!
Thank you! The fire hydrant was a gift from a friend. She found it at a store called The Christmas Tree Shoppe.
I absolutely love this room!! I love the colors and my daughters favorite color is purple!! I especially love the bed spread, I have to ask where u got it from!! Great job!!!!
Thank you! Bedding came from Target.
Hi Kim! I was wondering if there is another place I can find that bedding? It is no longer in Target ????
I think it may have been a Target brand. 🙁
what paint color did you use? and is there a tutorial for the bubble chandelier?
Hi Natalia –
The Blue is from Home Depot – Behr Ultra Satin – Base is 7754 – 510D4 Embellished Blue. The Purple is from Lowe’s – Valspar Signature in Satin – they based the color off from a picture I had and in their computer it is 1405 Snugglepuss.
There isn’t a tutorial for the bubble chandelier, but you’re not the first person to ask, so I’m planning on putting one together soon!
Thank you so much!! I’ve been wanted to do this theme for one of my daughter’s room.. She loves the little mermaid
Love this room…..where did you get the bedding?
Bedding came from Target. 🙂
Where did u get the picture frame?
I love this! My daughter now wants her room just like it! Where did you get the purple canopy for the bubble chandelier?
Thank you! I found the canopy on Amazon for $13!
This is absolutely adorable. I wanted to let you know that I am featuring this on my site at http://www.simplycreativemoms.com/girls-bedrooms.html if you don’t mind.
That’s so sweet. Thank you!
Can you tell me where you got the bed from?
The bed came from Overstock.com several years ago.
I want this comforter. Do you remember what it is called so I can search for it on eBay? Thanks in advance
I don’t. I’m sorry!