
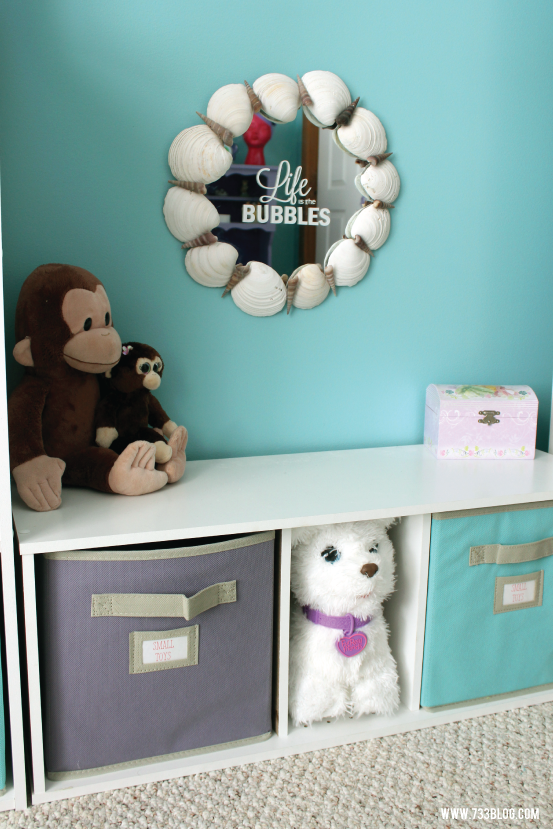
 I LOVE how this DIY “Life is the Bubbles” Sea Shell Mirror turned out for my daughters Mermaid Room. (If you have a moment, I would love for you to vote for my room in the Cricut Design Space Star Finals!)
It was simple and inexpensive to make and looks great on the wall.

I purchased a simple circular mirror from the craft store for about $5. My friend Winona was gracious enough to give me some of the shells from her sea shell collection from all of her trips to NC. I adhered them to the mirror using Gorilla SuperGlue. After those dried, I hot glued the other shells into place.
Lastly, I used my Cricut Explore to cut out the Life is the Bubbles graphic that I designed. I thought about doing a glass etching, but then decided to give the Cricut Window Cling a try. After cutting the window cling, I used transfer tape to adhere the cling to the mirror.
 I’m not going to lie – this was a bit tricky, because unlike vinyl, the window cling is not sticky. I just worked nice and slowly with a scraper. I also cut away the transfer tape after I got a portion in place, because if it accidentally touched the cling, it would pull it up again! It took a bit of finagling, but I’m really happy with the end result. Lastly, I used Velcro 3M Command Strips to hang it on the wall.
What do you think? Will you be trying it anytime soon?

This is really fun! We are in the planning stage of a makeover for a 9 year old’s bedroom – I’ll have to give her a peak at what you’ve done for some inspiration!
I’m in love with this room and would love to do something similar and give my daughter a big girl room for her 2nd birthday. She’s so in love with mermaids and the little mermaid. What color are the storage bins? I noticed there’s a few different “blue” options available, Pale Blue and Ocean Blue. Do you have a tutorial of the chandelier? Also, do you have a tutorial of the “look at this stuff” art? Did you use a standard sized fork? I love your mermaids accents and hope my daughter’s room comes out as cute as your little girl’s room.
The blue bins I used have been discontinued. 🙁 They were more of a turquoise color. I do not have a tutorial for the bubble chandelier, but it is SUPER easy. I purchased plastic Christmas ornaments that split down the center and simply added several to a length of fishing line. Do several lines and then tie them together at the top and attach them to a hook on the ceiling! The sign is just painted canvas and I used my Cricut Explore to cut the letters out of vinyl. The fork was actually a large serving fork, hence the 3 prongs. Look at your local thrift store, they usually have a few. Best of luck with your room! I would love to see pictures when you finish.