
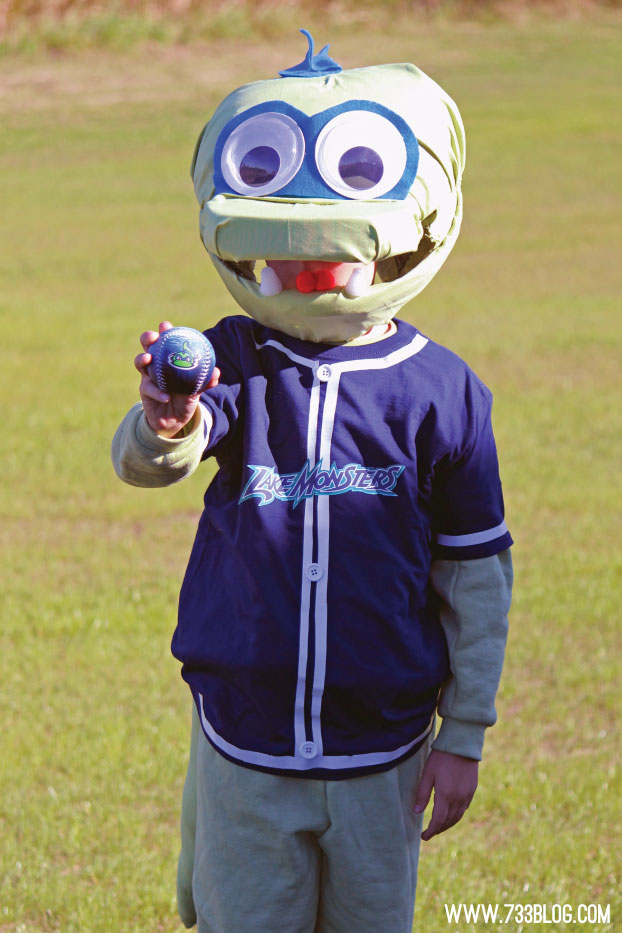
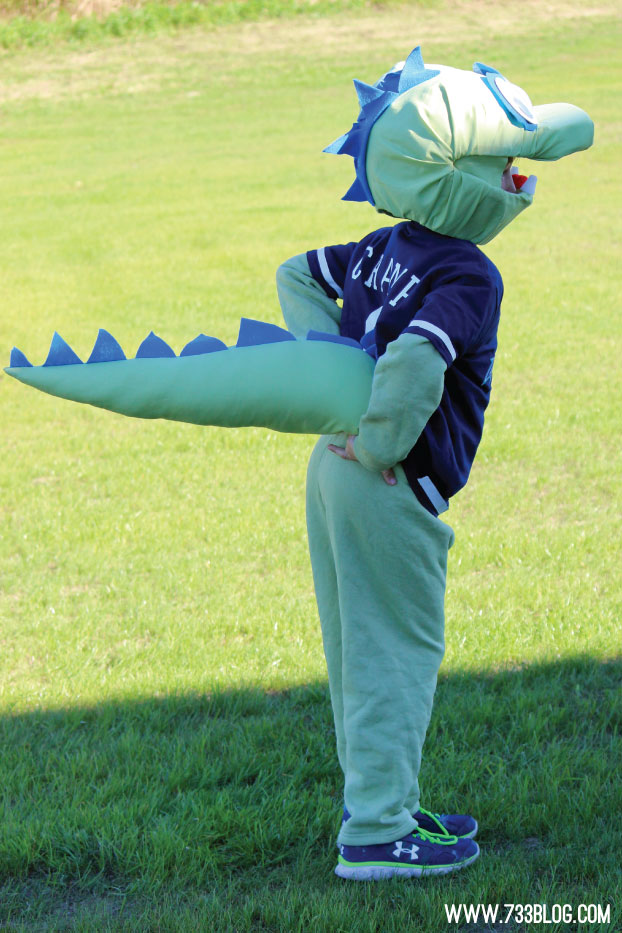
My son Mason had quite the request for his Halloween Costume this year. He wanted to be Champ, the mascot of our local minor league baseball team, the Lake Monsters. We went to a game this past Summer and my children fell in love with the big green mascot. We even stood in line to get our picture taken with him and he was such a ham and really gave my kids all sorts of attention. Of course when my son announced his intentions, I panicked for a minute. My hubby, on the other hand, egged him right on, saying “OF COURSE Mom can make a Champ costume!” THANKS Hubs. So here I am, showing you how I made a DIY Monster Costume.
 First I consulted with my friend Heather from Twin Dragonfly Designs. She is a Halloween Costume Rock Star! She had just finished up her boys Plants vs Zombies costumes, which had some crazy heads, so I asked her what she used. She had ended up with plastic bowls for one and aluminum pans for another. With that in mind, I kept my eyes open while out at stores for anything I thought might work. I came across some Food Screens at a local shop that were only $2.99 each. They were the right shape and I thought they’d be pretty easy to work with and would be light weight enough for him to wear trick or treating, so I grabbed two.
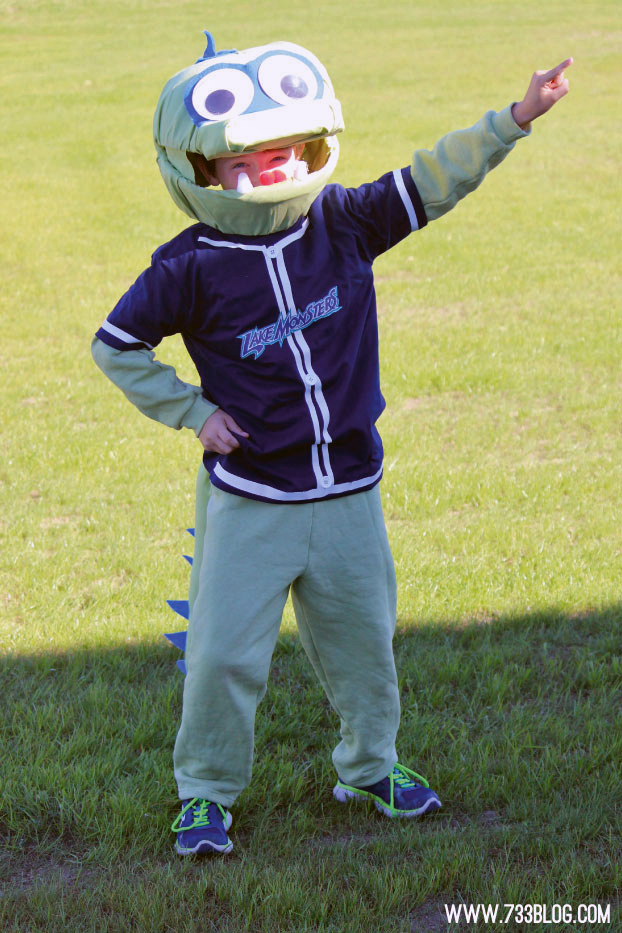
The first step was to dye a white sweatsuit Lime Green using Tulip Tye Dye. I just followed the directions on the packet and it worked perfectly.
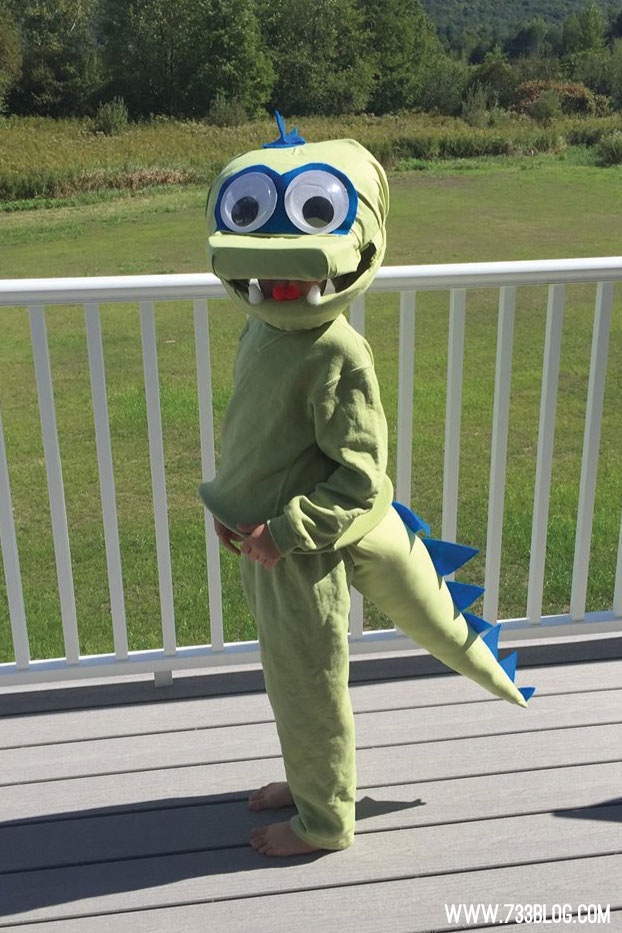
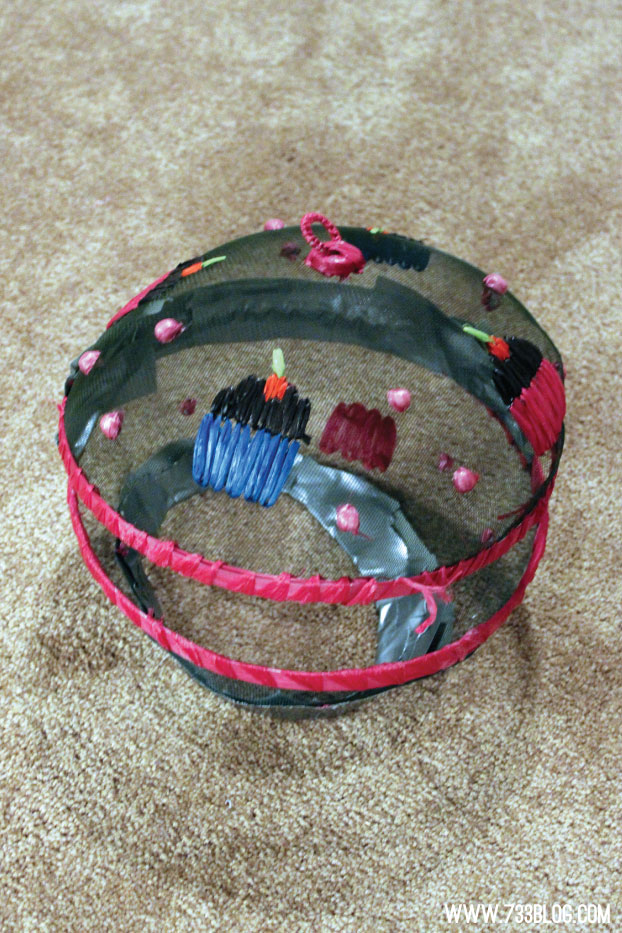 Next I started on the hard part – the head. I used Duct Tape to tape the two screens together. Once I had them secured, with one side open to create the mouth, I cut out a hole from the bottom screen and then used a couple layers of Duct Tape around the sharp edge. This is where my son would stick his head into the head.
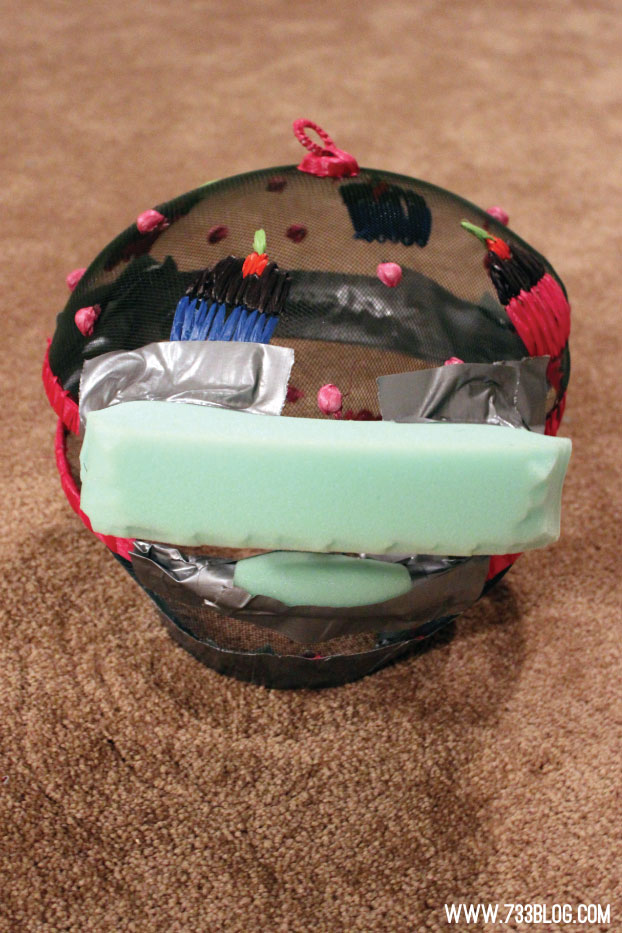 I had some left over home decor foam from when I upholstered a bench seat, so I cut it into the shape of Champ’s nose and Duct Taped it to the front of the top screen. I also cut a small piece to create a bottom lip and Duct Taped that in place as well.
 The next step was to cover the whole thing with fabric. I purchased 3 yards of green fabric (1.5 for the head, the rest for the tail) that I matched to the sweat suit I had already dyed. I couldn’t believe when I found a perfect match!
I started at the bottom lip and hot glued the fabric onto the inside of the screen. I wrapped the whole thing around then hot glued the fabric to the inside of the top screen, pulling the fabric taut. I then cut an X in the middle of the neck hole and glued those 4 pieces into place. This was the hardest part of the costume and I really just trimmed and glued my way around. I focused on the bottom first and worked my way up to the top. My best tip is to just go slow, take your time and double-check all cuts before actually cutting so you don’t accidentally trim the fabric to short!
Once you have the fabric in place, add on your embellishments. I used felt and big google eyes for the face and spikes. I cut down small foam cones to create the teeth and two pom-poms for the tongue. Because the screens were large, I added squares of foam to the inside top of the head so that the whole head didn’t wobble around when my son had it on.
Next, my son and I sewed his tail. I didn’t take pictures, but I drew up some instructions for you to follow. The Dinosaur Tail was super easy and I just winged it. I think it took us a total of 10 minutes.
I measured from my son’s hip to the floor and used that as a guide for the length of the tail.
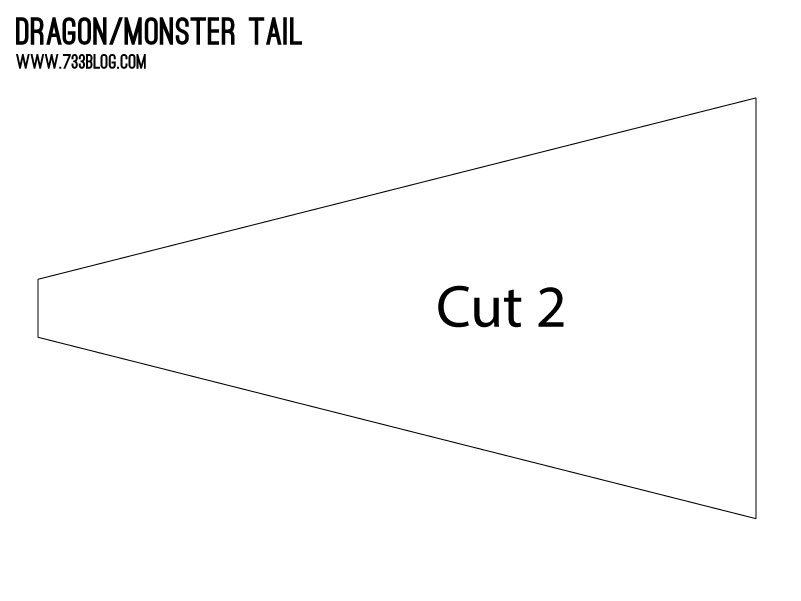 I then cut out two semi-triangles from the fabric, using the length I measured – it was about 24″ long by 14″ wide at the widest point (see image above).
I then cut out 9 triangles from felt. I started large and got progressively smaller. I just cut them freehand and then laid them out onto the fabric until I had the right amount for the length.
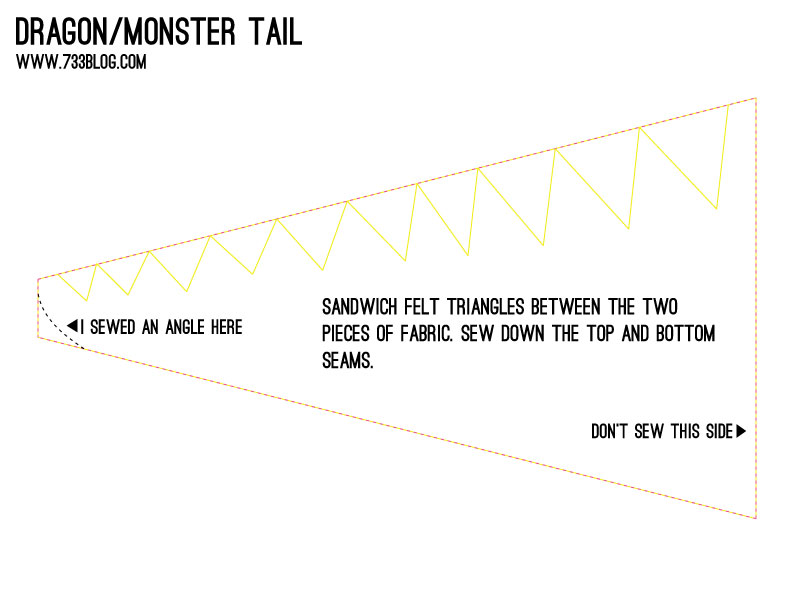 Making sure your fabric is right sides together, sandwich the felt triangles in between the two pieces, largest starting at the top and getting smaller towards the tip of the tail. Sew the top and bottom seams – I also angled the tip of the tail. Don’t sew the top opening shut yet!
Flip the tail right side out and stuff. We used about a half a bag of stuffing.
Using 1″ elastic, measure it around your child’s waist so that it is snug, add about a 1/2″ and trim.
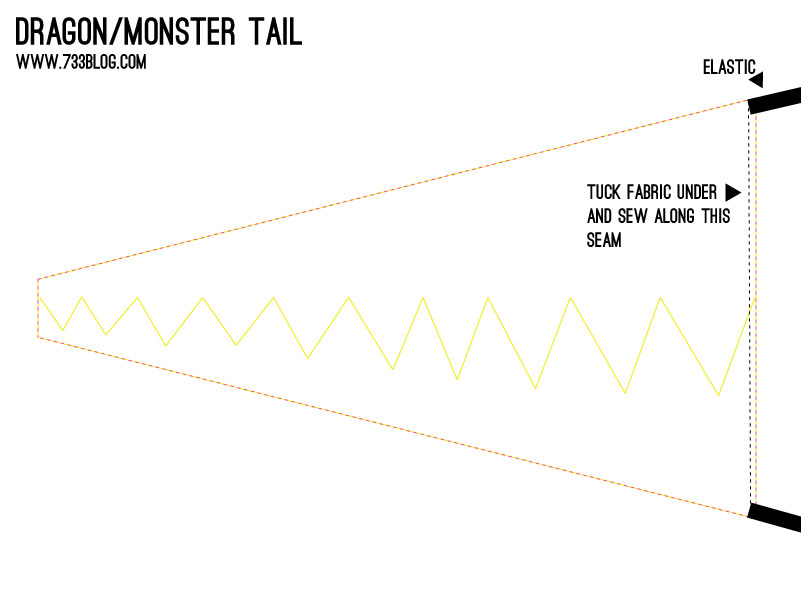
Fold the edges of the tail opening in and pin shut (top seam and bottom seam should be in the center – start by pinning there). Pin your elastic into the sides and sew shut. Your tail is complete!
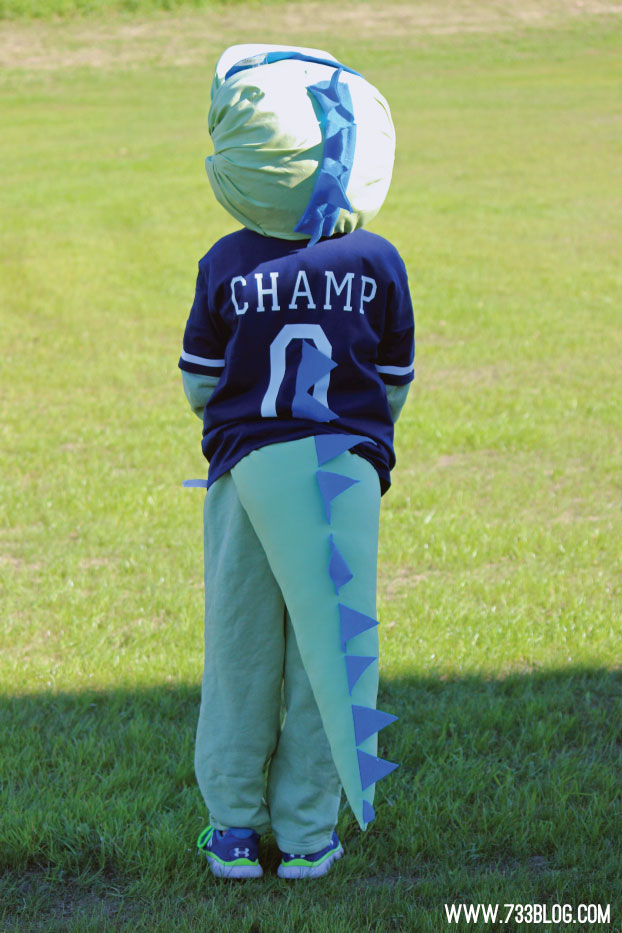
For most of you, that would be the end of your costume, but I also needed to create a “Champ” Jersey and to create a “hula hoop” belly. I used a plain blue t-shirt and embellished with white vinyl stripes. I used Glow-in-the-Dark Iron-On Vinyl from Expressions Vinyl for the “0” and “Champ” on the back. This is the only permanent piece I added to the shirt. For the logo on the front I used printable Vinyl and cut it out with my Cricut. I also sewed three white buttons down the front just like Champ. After Halloween, all of the vinyl pieces can come off and he’ll have a plain blue shirt with Champ and 0 on the back!
 For the “hula hoop” belly (because the mascot has a very round belly that he likes to jiggle while he dances) I used two glow stick necklaces that I hooked together and sewed inside the edge of the sweatshirt.

