
I’m Polly from Helping Little Hands. I’m a stay-at-home mom, temporarily turned substitute teacher, and I like to do crafts in my spare time…especially if it’s something fun for my kids (ages 5, 2 1/2, and 11 months) and/or is inexpensive since the Hubby is finishing up school. I’m here today to share with you these DIY Fabric Roads!
They’re perfect for the little one in your life. I thought of making these over a year ago after watching my then 18-month-old son get frustrated with toy train tracks, hot wheels tracks, or pretty much every other “road” that has to snap or hook together in some way. These are perfect for those little ones that LOVE cars, but have a hard time hooking all that stuff together…and now that my son is older, he still loves these fabric roads that can be taken anywhere and used on pretty much any surface…even on Daddy!

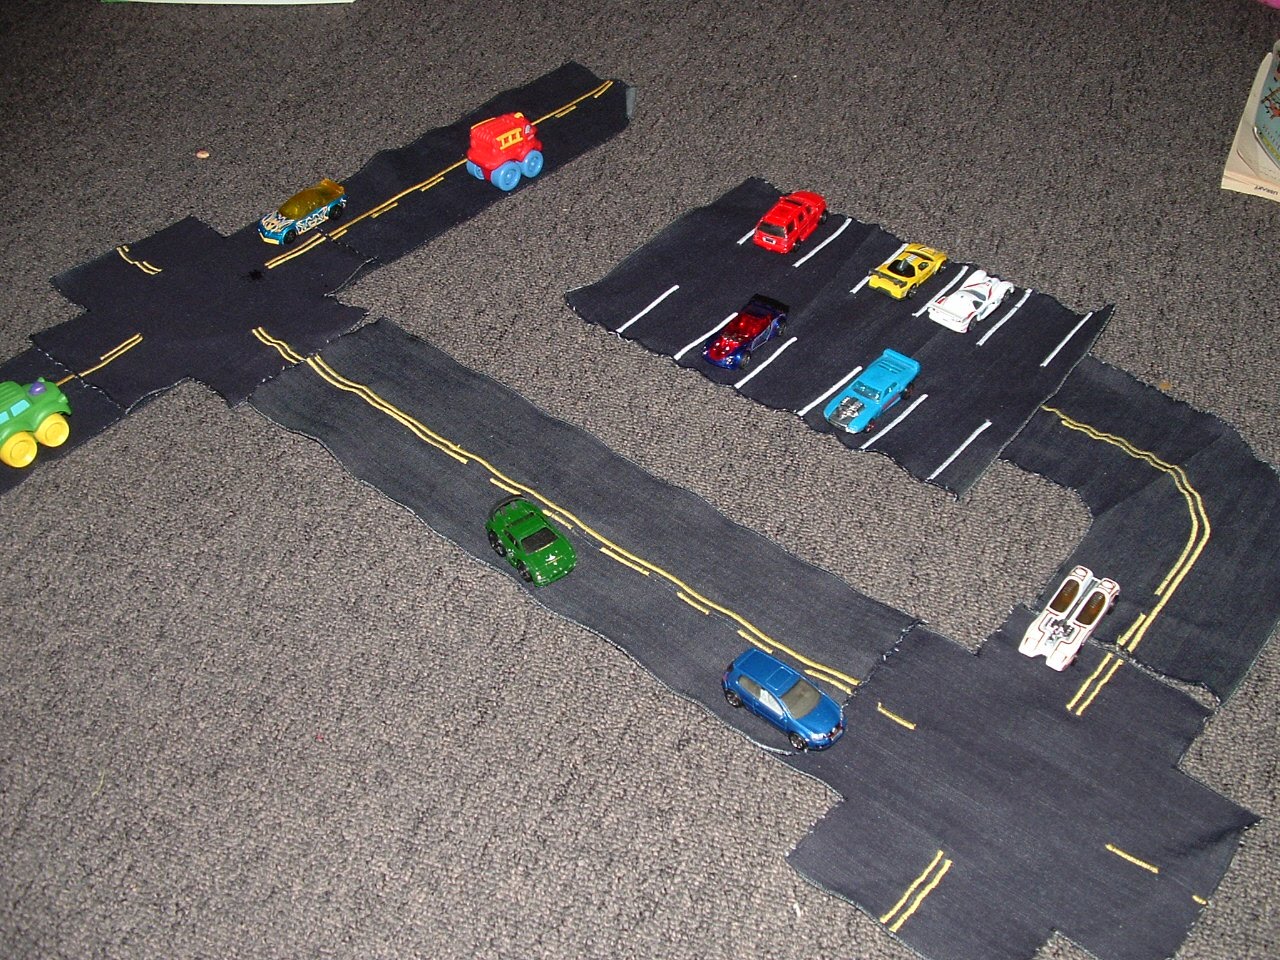
Initially, last Christmas I just made him straight roads.

But this morning when my son woke up to intersections…
…bends…

…and a PARKING LOT, he almost thought it was Christmas all over again!

The best part about these DIY fabric roads is that they’re easy to make, and there are lots of options for making them even easier than I did.
Materials:
Black Fabric (1 yard can make a pretty good set.)
white thread
yellow thread
sewing machine is helpful, but optional depending on what kind of fabric you choose
scissors or rotary mat
I chose to use stretch denim, but only because it was on clearance at Jo-Anns for 1 or 2 dollars a yard. The ideal fabric would be a little heavy (like denim, upholstry fabric, etc) and not have any stretch to it. Old jeans would work great too and make the project almost free. My goal was to make these cheap, so if I hadn’t found the denim on clearance, my plan had been to use flannel (because it was on sale for $1.50 /yd at the time.) If you want an option with no machine sewing, felt could also work, although they might not last as long if your kid is hard on toys since it can be stretched out of shape.
Directions:
Straight Roads
I made my roads 5 inches wide. This seems to be a good width to fit the typical size of matchbox cars. Some of the straight roads are 36 inches long and some are 18 inches long. Personally, I like the 18-inch long roads the best. (Sorry no picture here…but this is the easiest one.)
Intersections
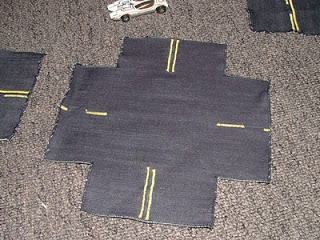
For the intersections, I started by cutting a 9-inch by 9-inch square piece of fabric.

Then cut 2-inch by 2-inch squares off each corner.

This leaves road parts to be 5 inches.

Curved Roads
I cut a 9-inch by 9-inch square piece.
Then used a dinner plate to make the outside curve.

Then I used the edges I’d already cut to guide me in cutting the other side so that the road is 5 inches wide all along it. These were the trickiest to cut, so you might try them last.

Parking Lot
I sent some of these to my nephew a year ago when I made them for my son, and when I was talking to my sister about the new pieces I was making, she told me that the best extension to a set would be a parking lot. How right she was! Every boy I know who’s into cars loves to drive them and then line them up in neat rows. The parking lot can be any size you want.

I made mine 9-inches by 13-inches because that’s what the pieces I had left worked out to be. 9×12 would probably have been better because then it would work out more even for the parking spaces. The lines for the parking spaces are spaced 2 inches apart and 3 inches long.
Now on to the sewing!
Once I cut my pieces, I used black thread to make a fairly wide zigzag stitch to sew around each of the edges.

I kept the stitch length pretty short because the fabric I was working with tended to unravel fairly easily.

If you have a serger, that would work even better. This will keep the edges from unraveling and getting frayed.
When you’re ready to sew the lines, you’ll want to start by marking the middle of the fabric to help keep your lines straight. I just used a regular pencil and my quilting ruler.

To make the traffic lines:
Use a zigzag stitch on your sewing machine with a VERY short stitch length. You may want to experiment on a scrap to see what width and length of stitch works best for your sewing machine and fabric. To avoid getting the stitching too bulky when I stopped and started my stitching, I went back and forth with a straight stitch to secure the thread and then sewed my line. If you’re just sewing a dashed line, you’ll want to go straight down the middle.

If you’re going to make a double solid line or a solid and dashed line, you’ll want to work just off to the side, and then use your first stitching line to guide the second line.

I used a mix of solid and dashed lines for variety and because I found the solid lines easier…but they look kind of boring if that’s all you use.
When I made the dashed lines, I made sure to secure the thread by going forward and back with a small straight stitch off to the side each time. To keep the lengths of the dashes approximately the same, I kept an eye on where the lines were in relation to the foot. When I could just see the first part of the dash coming out the back of my presser foot like this:

I would secure the stitches and then move the fabric forward until I could just see the beginning of the blank space at the back of my presser foot like this:

And then repeat until you’re finished!
Just BEWARE! Traffic at your house might get pretty congested!


Variations:
- If you prefer to sew by hand, you could easily make the traffic lines with embroidery thread instead.
- If you don’t like to sew at all…you could make the traffic lines with fabric or puffy paint.
- You could use felt as the fabric if you don’t want to zigzag the edges.
- If you want an even cleaner look for the edges, you could use a narrow hem instead of a zigzag stitch.
The possibilities are really endless! If anyone makes these denim fabric roads, I’d love to hear about it, and if you have any questions about the details you can email me at polly.helping.little.hands (at) gmail (dot) com.
I’ve got a lot of fun tutorials at Helping Little Hands. We’re just finishing up our Felt Food Cook-Along with more than 25 tutorials for different felt foods.


And this cupcake matching game to help your toddler match upper and lower case as well as learn their numbers.
And so much more!


those are way cool!
These are great! And, seriously, every little boy I know loves to line their cars up–the parking lot is genius! Thanks for the great tutorial!
I love all your projects. I recently made my daughter a wooden play kitchen and now she needs some felt food. Thanks so much for sharing.
Inexpensive and very portable – what a great little-boy toy!
so much good stuff!!! I really need to make those roads for my child care kids!! way less storage space! 🙂
So cute, my girls would love some fabric “highways” four our big bucket of play cars. After I finish our birthday party madness this will be jumping to the top of my crafty to-do list!
May need to make some more felt food too! ; )
Hi…I’m Laura from Italy; I also made felt food
http://chebirba.blogspot.com/search/label/Felt%20Food
lovely your bag on this post!
I’d like to invite you to visite my italian blog… Laura
That’s great Polly, I love it 😀
Hugs from Spain
meni from dalle un colinho
WOW! That is seriously cool!!!
I linked to your tutorial on Craft Gossip Sewing:
http://sewing.craftgossip.com/tutorial-build-your-own-play-car-roads-from-fabric/2010/02/25/
–Anne
SO SO SO Awesome. Yay for Craft Gossip. I’ll be gossiping about this with Adrianna later. Susan
Aww, these are fabulous! What a fun project. Katie emailed me about these and I’m so glad she did. I would love to link to these if you didn’t mind.
SUCH a great idea! I’ve made blankets with road designs, but this would allow for more creative play! You could even do railroad track on one side and road on the other!
ok – so this is my new favorite thing. This is just the push I needed to finally do something with rid of a couple pair of old jeans.
i just made the first of two strips of road. thanks so much for the great idea! i had some pretty weird blue colors jeans that were in the upcycle pile, and i used those. my zigzag is being temperamental, and i dont know how to fix the tension, sooo i had to improvise and use a hem on the edges with a straight stitch, which is time consuming since im too lazy to iron and pin anything lol. but the first two came out great, took a break and will finish the rest tonight. they are already a hit with my son!
This comment has been removed by the author.
I just came across this post while looking for some road fabric online. My son has been using our paper towels and scarves for roads. This is way better! I made these roads and posted on my blog about them.
http://raisingourfamily.blogspot.com/2011/04/fabric-roads.html