
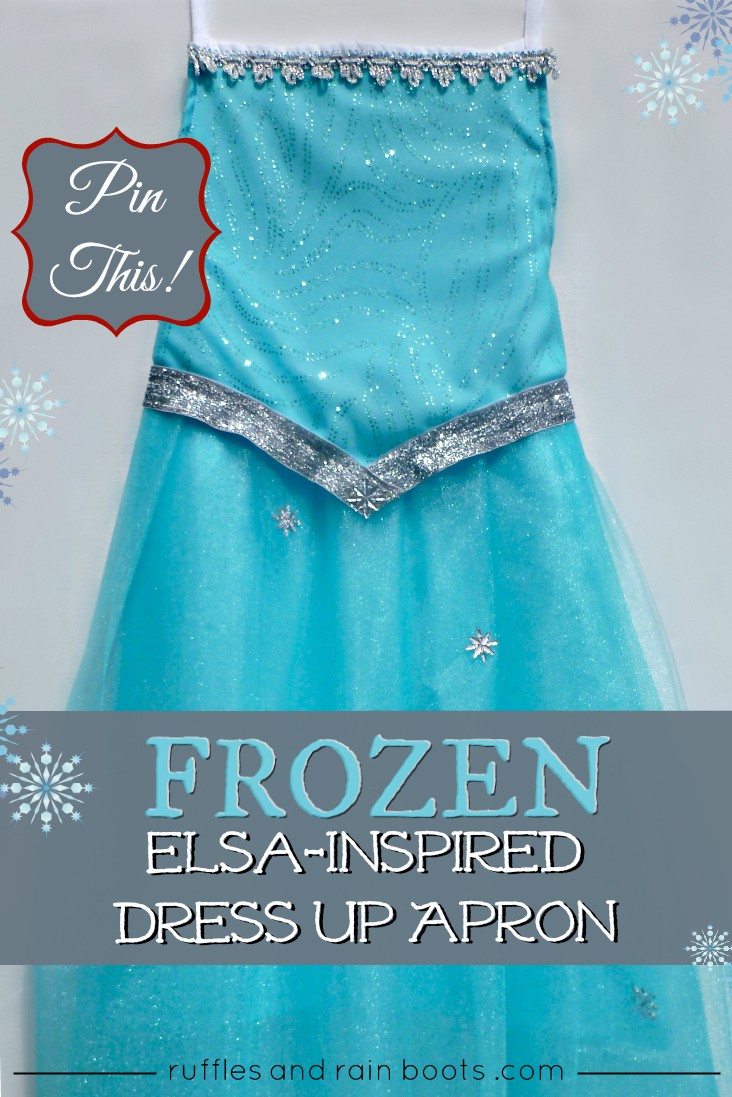

Hello, everyone! I’m Sarah from Ruffles and Rain Boots and I can’t tell you how excited I am to be here at seven thirty three. I’m so thankful (and a bit nervous) to be sharing my Queen Elsa Dress Up Apron today!
Like Kim, I find myself drawn to create, and after having a child a lot of the crafting I do now centers around our little girl, Elise. Over at Ruffles and Rain Boots, you can find us creating kid-centered crafts and learning activities, having fun designing decor and crafts for our home, and even whipping up some yummy goodies while we sing in the kitchen! Speaking of singing…
“Let it go. Let it go. Can’t hold it back anymore.”

Are you singing it? My 2.5 year old can’t stop singing it, which means I can’t stop singing it. Our daughter will twirl around the living room, throwing her arms out to her sides, just like Elsa from Disney’s FROZEN movie.
Making dress-up clothes is fairly affordable and I knew I could create something the little one would enjoy and not grow out of in 6 months.
Follow along with this simple tutorial to see our daughter’s newest addition to her dress up box: a surprisingly quick and easy Princess / Queen Elsa dress up apron that she will be able to use for years! I’m a beginner with sewing, so when I say “easy,” think “anyone who can push the sewing machine’s foot pedal down” kind of easy. Let’s get started.

A quick trip to the craft store, and you’ll be set to start. The total time it took to complete this project was about 3.5 hours, but that was including time to take pictures and notes in order to write up the tutorial. I would say plan on 3 hours.
For reference: my daughter is 2.5 years old and is wearing 2T and 3T clothes. The apron hangs down past her knees and we tie it up at the neck to bring it up on her chest. The measurement I’ve given for the skirt piece (blue satin), is long enough to be just shy of her ankles and is wide enough to loop around to form a skirt, but not too wide to hinder the tie. You can do a quick measurement of your child’s waist to make sure it’s the best fit.
I had no idea how much I was going to need, so I bought more than the amounts shown in the supplies list. If I knew then what I know now, I’d have bought the same amount of tulle, but reduced both the satin and glitter fabrics to half a yard so that’s what I’m recommending. For the glitter fabric, you might get away with a quarter of a yard, depending on where you want the pattern to fall. You could also purchase half a yard of the ribbons, because I have more than a foot left of the thick glitter ribbon and I only used 10 inches of the braid ribbon!
If you want to make an Anna dress up apron, check out my Frozen Inspired Princess Anna Apron Tutorial and buy all of your materials at once to save yourself a trip. I used the same blue satin for both aprons.

Supplies (all purchased at JoAnn’s):
- 1 child’s sized apron $2.19 (I bought a 3 pk at $6.59 with a 40% off coupon)
- 5 yards blue radiance sparkle tulle ($0.99/yd, $4.95)
- 2 yards clear water sparkle tulle ($0.99/yd, $1.98) **see note below
- 1/2 yard blue satin ($7.99/yd but on sale for $4.99, so $2.50)
- 1/2 yard Casa Collection Glitter Matte Jersey in blue radiance ($9.99/yd but on sale for $4.99, so $2.50)
- 1/2 yard of 1 inch shimmer velvet ribbon ($4.99/yd but on sale for $2.99, so $1.50)
- 1/2 yard of 3/4 inch silver metallic braid ribbon ($2.29/yd, so $1.15)
- Snowflake buttons left out of the photo ($2.29 for 24, but I used 8)
**In the supplies picture, I have two colors of tulle, but have only used one on the dress. The lighter color tulle is going to be used for the cape part that starts under Elsa’s arms in the movie. I haven’t yet figured out how to cut and attach it and with a huge list of crafts to do, I decided that it could wait to be added. If you like the dress as-is, only get the darker color. If you have any ideas how to do the cape, please let me know!

I have provided a free printable for the bodice pattern that I made (sized for a 12″x19″ child’s apron). Download the Elsa Inspired Dress-Up Apron Bodice Pattern. If your apron is a different size, you can whip up your own pattern like I did: lay some paper out on the floor and trace around the apron. It was a highly scientific and oh-so-exact kind of process, let me tell ya.
Cut the bodice pattern from both the blue satin and the blue glitter fabrics – be sure to add the half inch at the bottom of each. Pin the pieces together (satin facing up, glitter facing up – I top stitched this entire project; no turning). Having the blue satin backing helps to make the glitter fabric really stand out. The glitter fabric I used is sheer, so the white apron showed through if the satin wasn’t used.

Prepare bodice and set aside.
Cut the skirt piece. I used a rectangle, sized at 25 inches wide by 16 inches long for my daughter. This piece covers the white canvas when the tulle is attached so no white shows through, extends about 6 inches on either side of the apron ties, and also extends a nice, non-scratchy layer past the bottom of the apron.

I had never worked with satin before and didn’t know it frayed like the dickens, so after I hemmed it, I doubled it over and hemmed again. Lesson learned!
I only did the double-hem-thing on three sides because the edge at the waist was going to be covered by mountains of tulle and the stitching was going to be reinforced.

Prevent fraying with a double hem.
Sew up the bodice next, permanently attaching the glitter fabric to the satin. Put that aside and let’s give a shout out to some tulle.
Oh tulle! How do I love thee? Let me count the ways… Some people don’t like working with tulle, but I love it. It’s just so fluffy! And airy! And happy! And it’s so very forgiving if you’re a newbie at sewing, like me!
I used all of the tulle, but because I didn’t want Elsa’s skirt too fluffy (not as fluffy as the Anna Dress Up Apron I made), I didn’t sew it to be very full. For the tulle, I cut three pieces that were the width of my skirt piece (25″ x 16″) and doubled over off the bolt, like it came from the store. So basically, you have 6 layers of tulle pinned like this to the satin, but only had to cut three.

Make pleats in tulle facing towards the center.
I then took the tulle (from the bolt) and without cutting it, made a pleat 2 inches wide every two inches, starting from the center and working my way to the edges. Just pull a few inches of tulle past the side of the skirt that isn’t on the same side as the tulle. You want one seamless piece to be pleated.
Once I got to the end of the satin piece, I cut the tulle and did another layer like the pleated one just completed, alternating the pleats between the ones in the previous layer. Above is a picture of the pleats on the Anna dress, which I think is a bit easier to see with the darker tulle.
I know it’s hard to see in the picture below, but under the top layer of pleats is another one. It doesn’t add much ‘fluff,’ but it definitely adds to the visual appeal of the dress, especially when you attach the bodice piece.

Pleat the top two layers of tulle (4 pieces, if folded tulle is used).
A quick note: I used the full length of the tulle doubled over and then cut it down to fit my daughter afterwards. She was on a walk with my husband for this part and I couldn’t measure to get the length until she came back. If you are making this for an older girl, you’ll want to leave it the full cut of tulle, as it is quite long.
Once you’ve pinned your oh-so-many-layers-of-tulle, sew those to the satin piece so that they are really on there. I used a straight stitch and a dashed-zig-zag stitch to catch as many little sections of the tulle as I could. See the picture below.
The photo on the left of the picture below is before I sewed the skirt piece to the apron. You can see that I made sure the tulle wasn’t going anywhere! And yes, I’m guilty of excessive back-stitching when designing items for my daughter – kids are rough on stuff and I knew this would see a lot of play.
The photo at the right in the picture below is indicating the skirt piece (and therefore the tulle) should extend onto the apron strings so that when you tie it, it gives the appearance of a skirt. Mine extended just shy of 6 inches on either side, so Elise has quite a bit of growing room.
Stitch the skirt piece to the apron, using whatever you feel is best to make sure it never comes off. Ever.

Attach the reinforced skirt piece to the apron.
You could pause here to grab a glass of wine. Just sayin’ you could – we don’t judge over at Ruffles and Rain Boots. And let’s face it: if you’re making your kid a dress up outfit, you deserve a glass of wine.
Sip slowly.
Now, we come back to the bodice. You’ve already sewn the two pieces (satin and glitter overlay) together, so now we’re going to jazz it up a bit. I used a VERY sparkly 1 inch ribbon and just lined the very edge with it. I tried to follow the bodice curve as best I could, but let’s be honest: this is for a 2.5 year old, so there are spots that aren’t perfect.
I did one side, cut, pinned (taking care to fold the ends of the ribbon under to prevent fraying) and sewed it to the bodice. I then cut the other side and overlapped the point of the bodice, to give it a clean edge.
If you know how to do something swanky here, go for it. I didn’t – I’m a newbie, remember?

Add the sparkliest-sparkle ribbon you can find.
I then lined up the center of the apron with the center of the bodice (the point) and first pinned the points where the ribbon trim at the bottom of the bodice met the apron.
Once the bodice is centered and the bottom points pinned, wrap the edges of the bodice piece around the edges of the apron; just pull it around the edge of the apron and pin it. My daughter doesn’t like scratchy fabrics near her neck, so I folded down the top of the bodice (maybe a 1/2 inch) and used the already-finished apron as the top.
You could extend it all the way to the top of the apron if you are using a softer fabric or if you don’t believe your child will be bothered by it.

Pin bodice to apron – your Elsa dress is coming together!
Just a note: While sewing the bodice edges just before where the apron curved, I had to go slow. I had it pinned, but also had to tug it a bit so it would lay flat. When I got to the area near the apron strings, I reinforced the stitching quite a few times. I figured that if the apron would fail at any point, it would be here.
I left the bottom of the bodice (and the bottom point of the “V”) free because I thought it would help to allow freer movement. If you know something about sewing and know that this is WRONG, please let me know. 🙂

The ribbon trim at the top was pinned and attached and I had a mini celebration.

Add some more sparkle to your Princess Elsa Dress!
I almost stopped there but then I remembered the shiny, reflective snowflake buttons I had. I took one and hand-sewed it to the “V” on the bodice and added a few of them to the tulle. I attached the ones in the middle of the skirt to the top two layers of tulle and the ones on the sides got attached to a couple bottom layers of tulle.
If the snowflakes on the sides of the skirt were on the top layer of tulle, they could bother her arms as she’s swinging them around carelessly, like only kids and Disney characters are known to do.

Add snowflake buttons for more sparkle!
You’re done! Put on the soundtrack or the movie and sing and dance right along with Elsa! Here’s our little girl, twirling and singing. This is also a good shot to show that the apron becomes a skirt when tied at the back.

We’d be honored if you could share this with your friends and followers by using the share buttons below. Be sure to come over to Ruffles and Rain Boots.com or connect with us on social media.
As I mentioned previously, I also made a Princess Anna Dress Up Apron. Stop on by to make it!

Some of Ruffles and Rain Boots’ other popular posts include:


Ikea Latt Table Makeover | Monster Theme: Learn and Play
This tutorial was shared by Sarah Nenni-Daher.
Stay connected with Ruffles and Rain Boots:


I have been waiting for this tutorial! Can’t wait to get started! I have less than a month to make both aprons for my daughter’s birthday. Why, oh, why, do I do this to myself?!
Thanks so much for sharing!
xoxo