Started a home decor project that you thought would look really cool, got halfway done and decided it wasn’t quite what you wanted? That’s what happened with my DIY cardboard letters. I wanted to spell EAT on my blank kitchen wall – but I wanted the letters to be about an inch wide and 12″ tall… and I couldn’t find them ANYWHERE! I could buy them online here or there, but they were either out of a letter or the shipping was too high. Turning to my Facebook page, I got the swift kick in the butt from my readers that I needed to just make my own. I used cereal boxes, painters tape, paper, mod podge and silver paint to make them… well, I only finished the E, but you get the drift. I loved the end result and it was exactly what I wanted… until I put it up against my wall and decided it just wasn’t doing it for me. I already shared the tutorial on how to make those here.
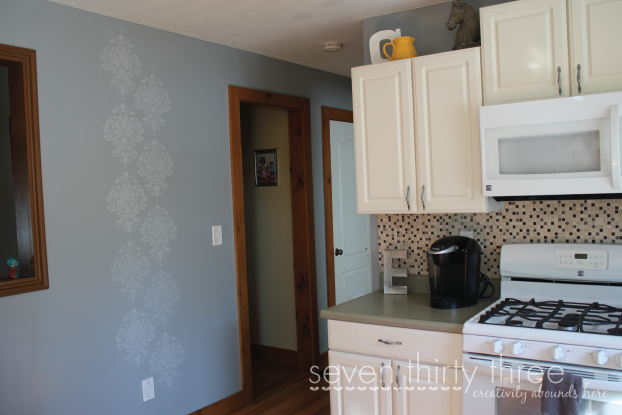
Today I’m going to show you what I ended up putting in that blank space in my kitchen that I felt needed a little something. After changing my mind on the letters I hopped onto Facebook and in my feed was a post by Cutting Edge Stencils. I have had this running thought in my head about how it would look cool to have just a strip of a stencil running vertical on my wall so when I came across their name again it provoked me to visit their site. Which is where I came across THE PERFECT stencil to turn my idea into reality. It fit my kitchen style and I thought it would be a fun touch to the blank space. Without further ado, check out my new stencil accent that I created using the Wild Berry Damask stencil by Cutting Edge Stencils:
I’m.in.love. It adds just the touch of what I was looking for!
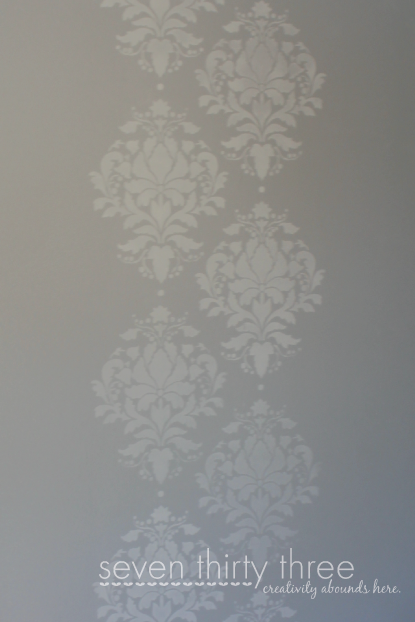
And here’s a close up:
The color is the same as the wall color with a bit of white added in to lighten it up.
This stencil was very simple to use. I used the roller that Cutting Edge Stencils provided, as well as their level that attaches to the stencil. The level was a BIG help with this stencil – especially since I was going vertical in the middle of the wall. I really didn’t want it to be crooked! I did about three VERY THIN coats for each (their are two patterns on the stencil) and I had to reposition the stencil 5 times. All in all it took about 1.5 hours to complete… mostly because I had to let the paint dry before moving on to the next set.
My central vac input through me for a bit of a loop. When I started stenciling I figured I would take the input off the wall and just stencil on through… but it doesn’t – well, I think it might if I get my hubby involved to detach the wires holding it in place – and trying to stencil around it was going to be near impossible and end with a clean and crisp design so I decided to just end it there.
What do you guys think? I asked my Facebook friends and the majority said leave it as is. It isn’t bothering me… but I’m a symetrical person so it might get to me after a while. Should I make my husband go the extra mile to remove the input and finish both the top and bottom so it goes baseboard to ceiling? Share your opinions please!
UPDATE: the longer I look at it the more I know I need to FINISH it! As soon as I get my hubby to take that outlet off, I’ll finish and snap some pictures to share the goodness!
Kim is a Marketing Director by day and Crafter/Blogger/Blog Designer by night. She lives with her husband, three beautiful children, and her dog and cat. You can also visit her design site, seven thirty three – – – creative blog design. For even more seven thirty three fun, like her on Facebook or follow along via Twitter!
Kim is a Marketing Specialist with Inspiration Media Solutions by day and Creative Blogger by night. She's a wife, mom of three beautiful children and two fur-babies, a Goldendoodle and a rescued Pibble. For even more Inspiration Made Simple, like her on Facebook and Instagram+.
Thank you so much for this post. I want to let you know that I posted a link to your blog in Creative Busy Bee Craft Inspirations, under the Page 2 post on Sep. 14, 2012. Thanks again.
Thank you so much for this post. I want to let you know that I posted a link to your blog in Creative Busy Bee Craft Inspirations, under the Page 4 post on Sep. 14, 2012. Thanks again.
My name is Kim, founder of Inspiration Made Simple, and I'm really glad you have stopped by!
I'm a mom, wife, DIY and fitness enthusiast. I love sharing simple and affordable ideas that help make your busy life easier, including craft tutorials, printables, recipes, party ideas, and fun family activities. Learn more about Kim...
Weekly Creative Newsletter
Creative inspiration in your inbox, never miss a post!
Thanks! Keep an eye on your inbox for updates including a free gift!
Join 12,000+ subscribers!
Join our mailing list to receive creative inspiration in your inbox and never miss a post!
As a thank you for subscribing you'll receive our printable Activity Cubes!
I LOVE wall stencils – great job!
It’s beautiful, but I would have to make it go baseboard to ceiling.
Thank you so much for this post. I want to let you know that I posted a link to your blog in Creative Busy Bee Craft Inspirations, under the Page 2 post on Sep. 14, 2012. Thanks again.
Thank you so much for this post. I want to let you know that I posted a link to your blog in Creative Busy Bee Craft Inspirations, under the Page 4 post on Sep. 14, 2012. Thanks again.
great job! so many things to learn here. thanks for the ideas.